SSH (Secure Shell) keys provide a more secure method of logging into a Linux server compared to traditional password authentication. By using SSH keys, you can ensure that your connection is encrypted and less susceptible to unauthorized access. In this guide, we will focus on accessing a Linux server using SSH keys with PuTTY, a popular SSH client for Windows.
Prerequisites
- SSH Key Pair: You should already have an SSH key pair (a private key and a public key).
- PuTTY Installed: Ensure PuTTY is installed on your Windows machine. You can download it from the official PuTTY website.
- PuTTYgen Installed: PuTTYgen is a tool that converts SSH keys into PuTTY’s own format (.ppk). It usually comes bundled with PuTTY.
Step-by-Step Guide
1. Launch PuTTYgen and Load Your Private Key
- Open PuTTYgen from the Start menu.
- Click on “Load” to import your existing private key file (e.g.,
id_rsa). PuTTYgen supports importing keys in OpenSSH format. - Once the key is loaded, you can optionally set a passphrase for an additional layer of security.
- Save the private key in PuTTY’s format by clicking “Save private key”. This will generate a
.ppkfile.
2. Configure PuTTY to Use the SSH Key
- Open PuTTY.
- In the “Host Name (or IP address)” field, enter the hostname or IP address of the Linux server you wish to access.
- In the “Port” field, ensure it is set to
22(default SSH port). - Under “Connection”, expand “SSH” and select “Auth”.
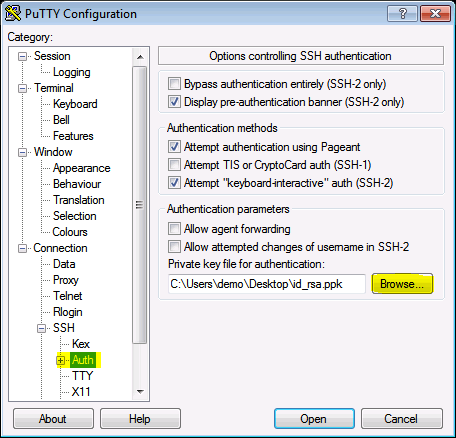
- Click on “Browse” and select the
.ppkfile you saved earlier. - Optionally, under “Connection > Data”, you can set the “Auto-login username” to your username on the Linux server.
3. Save the Session
- To avoid configuring these settings every time, save the session configuration.
- Go back to the “Session” category.
- In the “Saved Sessions” field, enter a name for this session (e.g., “My Linux Server”).
- Click “Save”.
4. Connect to the Server
- Click “Open” to start the SSH session.
- If this is the first time connecting to this server, PuTTY will prompt you to accept the server’s host key. Verify the fingerprint and click “Yes” to trust the server.
- If you set a passphrase on your private key, you will be prompted to enter it.
5. Manage SSH Keys on the Linux Server (Optional)
- If you need to add your public key to the server, you can do so by adding it to the
~/.ssh/authorized_keysfile on the Linux server. - Open a terminal on the Linux server.
- Ensure the
~/.sshdirectory exists:mkdir -p ~/.sshAppend your public key to the
authorized_keysfile:
echo "your-public-key" >> ~/.ssh/authorized_keys
Set the appropriate permissions:
chmod 700 ~/.sshchmod 600 ~/.ssh/authorized_keys
Troubleshooting
- Connection Refused: Ensure the SSH service is running on the server and that the server's firewall allows SSH traffic.
- Permission Denied: Verify that the private key corresponds to the public key in the server's
authorized_keysfile and that the permissions are correctly set. - Host Key Verification Failed: If the server's host key has changed, PuTTY will show a warning. This might indicate a security risk. Confirm with your server administrator before proceeding.
By following these steps, you should be able to securely access your Linux server using SSH keys with PuTTY. This method not only enhances security but also streamlines the login process, especially for frequent connections.